Tuesday, December 22, 2009

Fried Stuffed Peppers

This is another family recipe that doesn't really have measurements etc. To make fried stuffed peppers you basically take enough of the meatball recipe to fill as many cubanelle peppers you want to make. Grandma recommends that you try to buy the very straightest peppers you can find. I used 1.5 cups (approx.) for 2 peppers. Once the peppers are stuffed with the meatball mixture you heat a little oil in a pan and fry the peppers, turning them onto each side until the filling is cooked. Then the peppers are topped with tomato sauce and a little Parmesan cheese.
This was very easy and pretty fast. For a healthier version, I don't see why you can't bake them.
Here is a picture of the peppers right out of the pan. I basically divided the recipe by a third to make the filling. Any leftover filling can be made into meatballs so it isn't like you are wasting it by making a little too much.

Saturday, December 12, 2009

Lamb Meatball Gyros with Yogurt and Mint/ with Sauteed Zucchini and Peas

Yummmmm. Mmmmmmm. Soooo good! This was totally my reaction during/after dinner the other night. Sorry I haven't really been posting much. I'm still cooking, and taking quick pictures of the food. I'm just not really making it to the posting part of the experience. So did I mention this meal was good. I'm pretty sure I must might have. This was super easy, fast and not too unhealthy. Thank you Real Simple. Thank you Susan for introducing me to Real Simple. Thank you Jason for actually liking this meal. I don't have anything else to add. I thought this was super and if I don't stop gushing, I'm probably going to be disappointed with all the other meals we eat for the next month.


Lamb Meatball Gyros with Yogurt and Mint (from Real Simple)


1 pound ground lamb
1/4 cup golden raisins, chopped
1/4 teaspoon ground cinnamon
kosher salt and pepper
1/2 cup bread crumbs
1 large egg, beaten
1 bunch scallions (white and light green parts), sliced
4 pieces flat bread
1/2 cup fat-free Greek yogurt
2 tablespoons fresh mint
  1. Place an oven rack in the second-highest position and heat broiler.
  2. Combine the lamb, raisins, cinnamon, 1 1/2 teaspoons salt, 1/4 teaspoon pepper, the bread crumbs, egg, and three-quarters of the scallions in a large bowl.
  3. Shape the mixture into golf ball-size meatballs and place on a foil-lined baking sheet.
  4. Broil, turning once, until cooked through, 6 to 8 minutes total.
  5. Microwave the flatbread 30 seconds wrapped in a dampened paper towel. Divide the flat bread among individual plates and top with the meatballs, yogurt, mint, and the remaining scallions.

Sauteed Zucchini and Peas (adapted from Real Simple)


1 medium zucchini
1 tablespoons olive oil
1 garlic clove, minced
1/4 teaspoon kosher salt
freshly ground black pepper
1 cup frozen peas, defrosted
1/2 teaspoon dried thyme
  1. Chop zucchini.
  2. In a large skillet, over medium heat, combine olive oil, the zucchini, garlic, salt, and a few grinds of black pepper and cook, stirring occasionally, until the zucchini is softened, about 5 minutes.
  3. Add peas and thyme, toss well, and cook to heat through, 1 to 2 minutes.

Pickled Eggplant

As a child, when family would get together and have a big meal there would inevitably be antipasto (pronounced ahn-tee-PAHST). Small children would pick around and eat the Genoa salami, the chunks of provolone cheese, the pitted black olives from a can and that's about it. As I got older I personally became more and more adventurous. One of my favorite things on the antipasto tray is pickled (sometimes known as marinated) eggplant. This is sold in a jar at many Italiam markets. The problem is that the compamny stores the eggplant in vinegar or brine and it make the eggplant too tough and bitter. My grandmother showed me how to drain and "fix" the store bought kind, but the homemade version is somehow more satifying. My family was a little disappointed with the oiliness of the eggplant, because my grandmother insists the eggplant be stored submerged in oil. My parents seem to think it's fine as long as it is refrigerated. I gave away the remainder of the one jar I made (I don't have a canner so it isn't made for long term storage), so unfortunately I cannot attest to how well it is keeping. I thought it was delicious and you can just drain them a little before you eat them.

Pickled Eggplant

You can make as much or as little as you like. For me 1 medium eggplant is 1 jar or maybe a little more. For each eggplant use 3-4 cloves of garlic. You also need white vinegar (enough to submerge eggplant, corn or vegetable oil (Never olive oil!), salt, crushed red pepper, and dried oregano. The crushed red pepper and oregano is really to taste.

  1. Slice eggplant longways and put in a colander over the sink. Each layer of eggplant should be salted as you put it in the colander.
  2. Put something heavy over the eggplant to press out the liquid (I used a plate with a large bottle of vinegar on top. Let eggplant sit for 2 hours.
  3. Squeeze the eggplant out thoroughly.
  4. Boil vinegar and pour on eggplant. Squeeze eggplant out again.
  5. Put eggplant in a bowl and pour oil over them. Mix will and add more oil.
  6. Add chopped garlic, hot pepper, and oregano and mix.
  7. Put a littl oil in jars and add eggplant halfway up jar. Add more oil and then fill will egpplant being sure the top is covered with oil.
This is the recipe I followed.

Carrot Spice and Walnut Pie

Every year our local food bank, hosts a holiday dinner for those less fortunate at the beginning of December. It is between Thanksgiving and Christmas for those who will not be able to attend/provide one with their family. Every year the school where I work requests that we bake pies (some diabetic appropriate) for the dessert portion of the dinner. Last year I made a Cranberry Apple Pie and an Apple Butter pie. This year I decided to try something different. I made a Crustless Cranberry Pie and Cranberry Topped Apple Pie. I was going to make this Carrot Spice and Walnut Pie instead but I had to try it myself. My sister's best friend loves carrots and she thought this pie was delicious. I think I had pie overload and with so many other pies at our Thanksgiving dinner, I wasn't able to appreciate this pie. If you don't like pumpkin or want to try something different, then this might be the pie for you.

Carrot Spice and Walnut Pie (adapted from allrecipes.com)

1 (9") pie crust, partially baked
1 pound carrots, peeled and cut into pieces
1/3 cup honey
2 eggs
5 tablespoons softened, unsalted butter
1 tsp salt
1 tsp ground cinnamon
1 tsp ground nutmeg
1 tsp vanilla extract
1/2 cup chopped walnuts
1/2 cup brown sugar
1/2 cup white sugar

  1. Preheat oven to 350 degrees.
  2. Steam or boil carrots until soft and let partially cool.
  3. In a food processor, puree the carrots until smooth.
  4. Add honey, eggs, butter, salt, cinnamon, nutmeg, vanilla, nutmeg and walnuts and blend until smooth.
  5. Place carrot mixture in a bowl and fold sugars in gradually, getting out all the lumps.
  6. Pour mixture into pie shell.
  7. Bake pie for 60-70 minutes. Serve warm or cold, with or without whipped cream. Refrigerate to store.

Monday, December 7, 2009

Pasta with Kale and Blue Cheese


I am trying to try as many new things in cooking (or eating) as I can. This especially applies to vegetables. This is part two of the kale experiment. On second try, I think the kale reminds me a lot of broccoli raab in flavor. This pasta dish is full of very strong flavors. I chose a more flavorful blue cheese than I normally do. So thanks Darlene from Blazing Hot Wok for the recipe. I changed the proportions a little bit but here's the general idea.

Pasta with Kale and Blue Cheese (from Blazing Hot Wok)

1/2 cup pecans , toasted on a pan or under a broiler for about 5 minutes and lightly crushed
1/2 large onion, sliced
1/2 bunch kale, stems removed and roughly chopped
2/3 cup fat free half and half
2 oz of your favorite blue cheese, plus some for crumbling on top
a little skim milk, if necessary
½ lbs spaghetti
Salt and pepper to taste

  1. Saute the onions in a large pan with a little olive oil. When they are translucent (about 10 minutes), add the kale and saute until wilted. Remove to a bowl and keep warm.
  2. Put on your pasta water.
  3. In the same pan you used for the onions, add the half and half and cheese. Once the cheese is melted, add the onions and kale back in and mix well. Turn off the heat until the pasta is ready.
  4. Put the pan back on the heat and mix everything together. The pasta will finish cooking and absorb some of the liquid and at the same time, the sauce will thicken. If it gets too thick or dry, add a little milk to loosen it. Season with salt and pepper to taste. Serve immediately, topping each serving with some of the crushed pecans and crumbled blue cheese.

Thursday, November 19, 2009

Sausage, Kale and Onion Pizza

This pizza was inspired by the one from American Flatbread that we ate this summer. As usual, I liked it and J was indifferent. It contained some seasoned sausage, kale and sauteed onions. I used mozzarella cheese and some Parmesan. The crust was whole wheat store bought dough.

Sunday, November 15, 2009

Happy Falafel Day!

The cake was made by my friends in honor of falafel day that we "celebrated" yesterday. Basically I was going to make J some falafel for dinner last week and he wasn't into it. So we were going to have it for lunch and when that didn't pan out we had friends over for dinner. I used a recipe I found on Crepes of Wrath that apparently came from Angie Ketterman but I had to make so many changes that I'm just going to post what I did, instead of saying that it was adapted.
I had a really hard time at first with these falafel. The mixture was too wet, possibly due to the food processor over mixing the beans (?). So the first time when I attempted to make these at lunch time, the beans would stick together, I didn't have enough oil, and my oil wasn't hot enough and they completely disintegrated and it was a huge mess. Once we bought more oil and used our candy thermometer to monitor the temperature and I added a lot of flour to the beans, we end up with the beautiful falafel you see above.

Falafel

2 cans garbanzo beans, drained and patted dry
2 small onions, roughly chopped
4 cloves garlic
2 teaspoon red pepper flakes
4 teaspoons ground cumin
2 teaspoons baking powder
1 cup all-purpose flour
1 teaspoon kosher salt
1/4 teaspoon freshly ground black pepper
6 tablespoons chopped fresh cilantro leaves plus 1 tsp dried parsley

Canola oil, for frying

Toppings/Etc.

pita breads (heated 30 second in microwave to soften)
Chopped tomato
Chopped onion
Shredded romaine lettuce
Tahini sauce and hummus

  1. Combine all of the falafel ingredients, expect oil and flour, in the bowl of a food processor fitted with a steel blade.
  2. Pulse the mixture until coarsely ground. Transfer to a bowl or container and refrigerate, covered, for several hours.
  3. Add approx. 1 cup flour and mix to hold mixture together enough to form balls.
  4. Form the falafel mixture into balls about the size of walnuts and press to flatten.
  5. Heat 2-3 inches of oil (enough to submerge falafel) to 375 degrees F in a deep pot or deep fryer.
  6. Fry about 6 balls at once for about 3-4 minutes, or until golden brown.
  7. Drain on paper towels.
  8. Stuff each pita with falafel balls, chopped tomatoes, lettuce, onions, and hummus. Feel free to experiment with toppings.

Creamy Carrot Soup

I love pureed vegetable soups. The velvety texture and smooth consistent flavors, even if there isn't any cream, taste decadent and indulgent. The first time I ever had a carrot soup was my freshman or sophomore year in college at a little restaurant in town called California Cafe. I only ever had it once and I don't even know if they make it anymore, but ever since I have wanted to make it myself. I've made 4 carrot soups so far and this one is without a doubt the best one so far. Carrot and cilantro soup had too much tomato and a Mexican flavor. "Best" Carrot Soup had too much onion and at the time I didn't like the tarragon. Autumn Carrot Soup had so many other ingredients that the carrots didn't really feel like the star, and as I said when I made it: it still wasn't perfect. I don't know if Creamy Carrot soup was perfect but I would definitely make it again.

Creamy Carrot Soup (adapted from allrecipes.com) Serves 3 bowls or 5 cups

1/2 cup chopped onion
2 tbsp butter
2 1/4 cups sliced carrots
1/2 large potato, peeled and cubed
15 oz. fat free low sodium chicken broth
1/8 teaspoon ground ginger
1/8 teaspoon ground nutmeg
1 cup half and half
1 teaspoon dried rosemary, crushed
1/4 teaspoon salt
1/8 teaspoon pepper
  1. In a Dutch oven, saute onion in butter until tender.
  2. Add carrots, potato, broth, nutmeg and ginger. Cover and cook over medium heat for 30 minutes or until vegetables are tender.
  3. Transfer to a blender; cover and process until smooth.
  4. Return all to the pan; stir in the half and half, rosemary, salt and pepper.
  5. Cook over low heat until heated through.

It's bok choy, baby!


I have been wanting to cook with bok choy for a while. This week I found that the newly renovated grocery store is now carrying soba noodles. I figured they would be the perfect vehicle for my baby bok choy. I personally really like these noodles. The dish wasn't quite as flavorful as I would have hoped but it was chock full of vegetables and we even had leftovers.

Soba Noodle Vegetable Stir-Fry

3 heads baby bok choy, sliced
1 sweet onion, sliced
4 cups baby spinach
1 tsbp grated ginger
1 clove garlic, minced
1/4 cup hoisin sauce
2 tsp sriracha
1/4 cup peanuts (I would omit these next time)
1 tbsp peanut oil
1 tsp sesame oil
6 oz soba noodles
  1. Cook soba noodles according to package.
  2. Heat peanut oil in frying pan. Add onion and cook 2-3 minutes. Add bok choy and cook until almost wilted.
  3. Add ginger, garlic and spinach, and cook until spinach wilts.
  4. Add the sauces and the peanuts and use tongs to coat vegetables in the sauce.
  5. Add soba noodles and sesame oil and tosss to coat. Serve hot.
I would definately use baby bok choy again. It was delicious! The noodles and the sauces didn't come out the way I wanted. I think I need more practice.

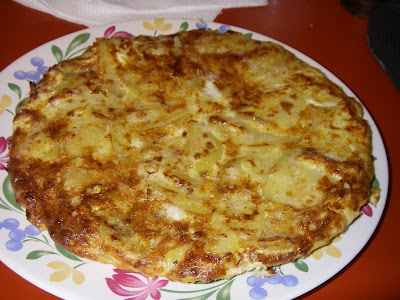
Tortilla de patatas


When I (briefly) lived in Spain, the woman who owned the house where I stayed made all my meals for me. Unfortunately we weren't really allowed in the kitchen. I would have liked to have learned how to make some of the more tasty meals. For the most part however, I just wanted to be able to cook for myself.

There were some definite highlights, for which I haven't been able to find a good recipe. And some disasters which I choked down as quickly as possible. Lentejas (lentil soup) was unbearable until she told me that they put cider vinegar on it as a condiment. Another time I was trying to get out of eating this sickening magadalena cookie/cake for breakfast when I saw her eating bread dipped in olive oil and I asked for that instead. She told me she never saw a North American who like that and couldn't believe I wanted that for breakfast (and that's what I had for the rest of the semester with my cafe con leche). Several times she couldn't describe what we were having in specific enough terms, so it wasn't until I went to the grocery store and looked around that I found the ingredient she simply described as "verdura" or vegetable. It turned out to be an Italian flat bean (or runner bean) in the mysterious "tortilla de verdura". I still pine over the tortilla de gambas (shrimp fritters). The gazpachuelo (mayonnaise soup) still makes me want to gag.

While I was in Spain one of the most popular tapas or dinner meals was the tortilla de patatas, known also as the tortilla espanola. Unfortunately for me, we ate it so often I started having to spread some Laughing Cow Cheese (La vaca que rie) on my tortilla. Now that I am home I sometimes crave the foods of Spain. This meal is a combination of several things. I knew J wouldn't just eat tortilla for dinner so I made chorizo (not the Spanish variety), I also made pan y tomate, which is just bread with tomato rubbed over it and a little olive oil. I think this was possibly the best tortilla I've made to date.
Tortilla de patatas

4 medium potatoes (waxy is best), very thinly sliced
6 eggs
1 onion (I prefer sweet onion), chopped
olive oil
salt and pepper

  1. Heat approximately 1/2 inch of olive oil in a large frying pan.
  2. Gently fry the potatoes until almost soft. The potatoes should be more boiling in oil rather than frying to crispy. Stir so the potatoes don't stick to the bottom of the pan.
  3. Add the onion and continue frying until soft.
  4. Drain vegetables to remove excess oil (it is possible to start with less oil but the result is sometimes burn potatoes).
  5. Beat the eggs and season with salt and pepper. Add eggs to potato mixture and mix. Heat a little oil in frying pan on medium heat (you can also just spray pan liberally with oil to make sure to coat it evenly).
  6. Pour in egg mixture and shake the pan periodically to keep tortilla from sticking.
  7. Once the bottom is set and the sides are started to pull from the edge a bit you have two choices: either move the oven safe frying pan to the broiler and finish the top in the oven (this is the method I used this time) or place a flat plate over the pan and quickly invert, then slide the tortilla back into the pan and continue frying, again shaking from time to time.
  8. Serve hot or room temperature cut into wedges.
Serves 8

I prefer the method I used here, because there is less room for kitchen disaster.

Tuesday, November 10, 2009

What happens when you use yeast that has expired...


Being a Spanish teacher, sometimes I have the opportunity to cook something for my students. Last week I promised my well-behaved classes that I would make them Pan de muerto in honor of Day of the Dead. Unfortunately I didn't realize until after the dough was supposed to rise that the yeast had expired in August. Being stubborn, I decide to go ahead with the recipe even though this dough hasn't risen in the slightest. So the bread came out badly and I told my students that we won't be having pan de muerto this year. If you want to attempt this, make sure you have fresh enough yeast. My house also tends to be too cold for the dough to rise correctly, so I may be avoiding baking bread until the more humid months (when nobody wants to be baking bread).

Pan de muerto (adapted from azcentral)
1/4 cup milk
1/4 cup butter, cut into 8 pieces
1/4 cup sugar
1/2 tsp salt
1 package yeast
1/4 cup warm water
1 egg separated
3 cups flour
1/4 tsp cinnamon
2 tsp sugar
  1. Boil milk and remove from heat.
  2. To milk add butter, sugar and salt.
  3. Mix yeast with water. Let stand until frothy. Add to milk.
  4. Separate egg, beat yolk and add to yeast.
  5. Add flour and blend to form a ball.
  6. On a floured pastry board knead dough until smooth and return to bowl.
  7. Cover bowl with a towel and let rise 90 minutes.
  8. Grease baking sheet and preheat oven to 350 degrees.
  9. Knead dough again and divide into fourths. Braid 3 parts pinching the ends to close. Form 2 bones with remaining dough and place over braid in a cross.
  10. Cover bread with towel and let rise 30 minutes. Mix cinnamon and sugar together. Brush braid with egg white (beaten) and sprinkle with cinnamon and sugar.
  11. Bake 35 minutes.

My Favorite Meatballs in the Whole World

Italian Meatballs on Foodista
My father is 100% Italian-American. As a child we ate a LOT of spaghetti and meatballs. My parents never ever used jarred tomato sauce or frozen meatballs. I think our meatballs are pretty unique and my grandmother says she always had trouble keeping the kids out of them before she put them in the sauce. They are so good plain that we usually ate them plain or topped with sauce afterward. My parents sometimes soaked them in sauce if we were having a party, but there's nothing like a fresh plain meatball out of the bowl (they have to cool a second) sprinkled with a little Parmesan cheese. I can remember sneaking them out of the bowl as a child too. I've tried baking these as well but they don't get nice and crispy that way. But if you are looking to be a tad healthier, I guess there are worse things than a baked meat ball. These are not the fall apart "dog food" meatballs you get in one of those dives. These meatballs are dense and flavorful. Best eaten fresh or at least the first day. This is not a diet/healthy recipe. So do what I did. Put on a pot of sauce and invite a few friends for spaghetti and meatball night, with a long walk afterward. There's nothing wrong with indulging a little here, especially if you are eating less of the forbidden food because you are having guests.


Meatballs
1 1/2 lbs. ground beef (my mother used to use her own home ground chuck)
1 1/2 cups seasoned breadcrumbs
cover top with parsley
sprinkle with pepper
1/2 tsp. salt
1 cup grated Parmesan cheese
1 tsp. garlic powder
3-4 eggs
  1. Mix all ingredients together.
  2. Add a little water (1/4 cup) to make moist.
  3. Roll with hands into golf ball sized balls (or slightly larger).
  4. Brown in hot oil.

Saturday, November 7, 2009

"Pinchos Morunos"


Why is the title in quotation marks? I had intended to attempt to recreate the pinchos morunos we ate in Baltimore last week. Even though I have lived in Spain, I had never heard of pinchos morunos before our meal at Tapas Teatro last week. Pinchos morunos means Moorish thorns in Spanish. However, J later told me that it wasn't as good when he ordered a second plate of them. Nonetheless, I had already planned this weeks meals and that was what we were going to have. They would have been more flavorful, had I marinated over night instead of the four hours when I came home. They also would have tasted better using a grill, as opposed to the broiler, but it's quite cold and dark at night and I'm not going out there by myself. All in all, I thought this meal was great.

I didn't measure and I'm not sure I can remember everything I did but here's a good try:

  1. Create the spice mixture: I ground all my spices in my mortar and pestle, because I only had whole coriander seeds. In addition I added turmeric, salt, pepper, cayenne, cumin, a clove of garlic, paprika and oregano. I mixed the spices with olive oil and I put my large chunks of pork tenderloin in a Tupperware container with the marinade and a few tablespoons of freshly chopped cilantro and lemon juice. I shook the container to mix and I chilled for 4 hours.
  2. I used fat free Greek yogurt, feta, cilantro, and some ras el hanout spice mixture (maybe a pinch for a 1/4 of a cup) and combined them to make something similar to a raita/tzatziki for my pita.
  3. I baked the pita in the oven (brushed with olive oil and sprinkled with salt) for about 5 minutes until crisp like chips.
  4. I broiled the meat on high, turning once for maybe 15 min total (that may be an over estimate). Once it was done I sprinkled it with more fresh cilantro. While the meat etc. was cooking I cooked 1/3 of a red onion and a whole green pepper sliced on in a saute pan with a little olive oil and a clove of garlic. I served everything with whole wheat couscous.

It was delicious. I know it wasn't any particular authentic cuisine but I don't care.

Thursday, November 5, 2009

Gnocchi with Brown Butter and Sage


Gnocchi is one of those things that I like but I'm not really sure why. I think when you have the perfect gnocchi there is just something about it that tastes indulgent. The problem occurs when you come across an inferior gnocchi. I try not to be too much of a food snob but unfortunately when you are a foodie, every once in a while you have an opinion. I don't usually order gnocchi out. I have made several of my own versions and I find the best gnocchi to be light and fluffy without being heavy and sitting like a rock in your stomach. It shouldn't be too gummy or chewy either. I tried the dried store bought gnocchi this week but I don't know if I'll bother with it again . It was rather hard for my taste.


Gnocchi with Brown Butter and Sage (inspired by a post from Morsels & Musings)

3 tbsp butter
10-20 sage leaves removed from the stem
1 package dried gnocchi, cooked according to package directions
1/4 cup freshly grated Parmesan cheese
1/2 sugar
Pinch of salt
Pinch of pepper
Pinch of cinnamon

  1. Place butter into a frying pan over medium heat.
  2. Cook until melted then add sage leaves to pan.
  3. Cook butter and sage leaves for 4-5 minutes or until sage leaves are crisp and butter has turned a medium nut-brown colour.
  4. Season with salt, pepper, sugar and cinnamon.
  5. Pour sauce over gnocchi and toss to coat.
  6. Sprinkle with Parmesan and serve immediately.

Tuesday, November 3, 2009

Victoria Gastro Pub,Tapas Teatro and Issei Noodle

Last week we went down to Baltimore (twice) to my parents and to go to the Jewel concert. The concert was fabulous (the parking was a different story). On Sunday, with my parents, we went to a restaurant in Ellicott City called Victoria Gastro Pub. It was amazing! Compared to some of the restaurants where we live, it was a nice change. The menu changes monthly but we had clams casino flatbread, lobster grilled cheese, honeycrisp apple salad (not really worth it), oysters on the half shell (I didn't partake but they seemed to enjoy them), fried oysters, duck fat fries, veal tenderloin with scallops and fresh corn relish, crab cake, crispy duck breast with sweet potatoes, venison leg with chard and a parsnip puree, lemon basil mojito, and a pom margarita. I think I could have died happy after that meal. Literally I loved almost everything I tasted.

Last Tuesday before the concert we back to Tapas Teatro. I had one of my favorite birthday dinners there with my parents and I really wanted to go back with J. Their menu also changes regularly. The restaurant is connected to the Charles Theatre and you can even take your drinks to go into the theatre. It's a very small place but on a weeknight we were able to snag a table. I think J ended up having a good time. There was even one tapa he liked so much that he ordered a second one as soon as he had finished the first. Here is the list of tapas we ordered and whether or not I would get it again.
Pea Fritters-no
Manchego fried with honey truffle oil-no
Camarones fritto-maybe
Molasses Soaked Salmon-yes! (this was my favorite)
Spicy Chicken Croquetas-yes!
Pinchos Morunos-J ordered 2!
Albondigas-maybe
Grilled lamb chops with rhubarb bbq sauce-yes

We also had a glass of sangria and a bottle of Hornsby Cider, both of which were very tasty and the chocolate Royale for dessert, which was kind of a waste but I really wanted something sweet. I always seems to forget to photograph my food in restaurants (maybe because I think it is a little tacky) so I have no pictures but take my word for it, DELICIOUS.

Lastly we were trying to find something interesting to eat last weekend (J had it in his head he wanted to eat BIG GAME, really big like a lion or tiger. I had to remind him it was illegal and offensive but he proceeded to search anyway.) We ended up at the noodle place in Carlisle, PA, Issei Noodle. We really like it there, despite some of the reviews. It's a family run business with very few people working and the only waitress in the evening is the owner/chef's daughter so you have to be willing to lose a bit on service to enjoy the food. Plus it's a noodle place, not a white tablecloth establishment, so some of the online reviewers should calm down a little bit.

This week I decided to go out side my comfort zone (I almost always get the Okinawa Yaki #14). I finally broke down and ordered the Beef Pho. Make sure you order the bean sprout side, it doesn't come automatically-probably because it is hard to get PA residents to try new things. J got the usual #13 Yaki Udon subbing ramen for the udon noodles. I recommend 14 or 8 or maybe 13 and 11 (I think) is also good.

Wednesday, October 28, 2009

Fig, Brie and Watercress Pizza with Prosciutto

Every once in a while I invent a recipe that tastes fabulous and I'm amazed with myself. This was not one of those times. I wanted to use up some ingredients I had in the house and I wanted to try something new. Personally I didn't think this was terrible but J once again was not a fan. I think it would have been a little better with more cheese but c'est la vie. Considering this wasn't one of the pizzas/flatbreads that I had "invented" for my "imaginary restaurant" I wasn't too crushed that it didn't taste fabulous. Firstly I wanted to use some figs and brie I had around. This may not have been the ideal vehicle. I also think the figs they have at me grocery store aren't really the best so it could be better under different circumstances. But enough of making excuses. Here is the recipe, perhaps your at home food critics will like it better than mine.

Fig, Brie and Watercress Pizza with Prosciutto

1 whole wheat pizza dough
1 tbsp cornmeal
8 dried figs
2 tbsp sugar
3/4 cup water
1 hand full watercress
4 oz. brie cubed
4 slices prosciutto, torn into pieces

  1. In a small sauce pan heat figs with sugar and water until softened. Drain reserving 3 tbsp liquid and puree in a mini-prep food processor until the consistency of preserves.
  2. Spread dough and press into cornmeal. Heat oven to 400 degrees and spread some cornmeal over the pizza stone.
  3. Spread fig spread over dough. Top with cheese and cress.
  4. Bake 15-20 or until dough is baked and cheese is melted. Remove from oven and top with uncooked prosciutto.

Shrimp and Feta Pasta


I had been putting off making this because J seemed to be very negative towards the whole idea, considering he hated it and wouldn't finish his portion may prove there is some stock in his opinion of hearing about the meals. I personally thought it was tasty but maybe not tasty enough for a repeat performance. For lunch on Saturday I whipped this up, it was very easy. I would say it's probably better to follow Kevin's recipe, because I was stuck using dried herbs and shrimp I had already cooked. Enjoy!

Saturday, October 24, 2009

Chicken Cordon Bleu

One of my favorite meals as a child was Chicken Cordon Bleu. I just loved the sauce. J had requested that I repeat some meals once in a while (instead of having something new every night). This is a meal I first made when I was living in the apartment and first learning to cook. The picture above is J's plate. Mine had more broccoli, less rice, and a smaller piece of chicken, unfortunately it didn't photograph well, so this is the best we have.

When I was living in the apartment I was just as much of a recipe junkie as I am now, except I didn't know about all the wonderful resources on the net. I also didn't have as many cookbooks (not that I have too many, 44, now, but I have run out of room and I can't buy many more until we either move or rearrange the house.). In those days I spent most of my time using allrecipes.com. At the time I adored the site. Now I have tried branching out more and have become more of a foodie, I don't use it as much. I am a little more selective about my cooking these days as well. Every once in a while I still go back and use one of the really great recipes I found there or I find something I had really meant to try but most of the time I am spending my time reading and browsing through the wonderful world of food blogs. I only discovered they existed last year. I don't think I really thought about how blogs could have a theme. I just thought people were using them as an online type diary, which I thought was a little juvenile and lame to put your diary online for all to see. I don't know how I stumbled onto a food blog, nor do I remember the first one I found (it might have been 101 Cookbooks). At any rate I was completely hooked.

This is one of my favorite recipes from allrecipes.com. I have a few others I really enjoy but I think I've made this 3 or 4 times now (which is really saying something). I have modified the recipe somewhat and I still wish I had my mom's because I think her recipe tasted the same without the bouillon cube which I would prefer not to use in the future. I served this with steamed rice and broccoli.

Chicken Cordon Bleu (adapted from allrecipes.com)

2 skinless, boneless chicken breast halves
2 slices Swiss cheese
2 slices ham
2 tablespoons all-purpose flour
1 teaspoon paprika
2 tablespoons butter
1/3 cup dry white wine
1 cube chicken bouillon, crushed
1 tablespoon cornstarch
3/4 cup half and half
  1. Pound chicken breasts. Place a cheese and ham slice on each breast within 1/2 inch of the edges. Fold the edges of the chicken over the filling, and secure with toothpicks. Mix the flour and paprika in a small bowl, and coat the chicken pieces.
  2. Heat the butter in a large skillet over medium-high heat, and cook the chicken until browned on all sides. Add the wine and bouillon. Reduce heat to low, cover, and simmer for 10-30 minutes, until chicken is no longer pink and juices run clear.
  3. Blend the cornstarch with the cream in a small bowl, and whisk slowly into the skillet. Cook, stirring until thickened. Remove the toothpicks, and transfer the breasts to a warm platter and pour sauce over the chicken. Serve with steamed rice, with extra sauce on the rice.

Friday, October 23, 2009

Pear and Blue Cheese Pizza


This is hands down the meal I make most often for J and I. I found the original recipe on
allrecipes.com but I do my own thing most of the time. I may have said in the past that I'm not really a fan of raw pears. I don't like the grainy, sandy texture. Cooked pears are delicious. This meal uses the ever popular pear and blue cheese combination. I'll post the link to the original recipe but I have varied this many times.

Pear and Blue Cheese Pizza (adapted from allrecipes.com)

1 pizza crust
(I dislike the pre-baked crusts immensely, I either make my own, make flatbread dough, or buy just the dough. Here I used whole wheat dough from the store. I try never to use the dough in the can, it has a funny taste.)

1 bosc pear, peeled and cut into slices or cubes (slices work better on flatbread because chunks are heavier and flatbread doesn't cook as long)

olive oil

6 slices provolone cheese

1/4-1/2 cup blue cheese (I have used all kinds of varieties. I wouldn't use anything too expensive because you aren't eating it raw)

~1/4 cup nuts, coarsely chopped (I recommend walnuts as stated in the original recipe. We have tried several types and sometimes we have even forgotten the nuts entirely)

1 tsp dried rosemary, crushed

freshly ground pepper

  1. Spread the pizza dough out. If you are using a baking sheet cover with parchment paper.
  2. Brush dough with olive oil.
  3. Cover dough with provolone cheese, pears, blue cheese, nuts, rosemary, and pepper in that order.
  4. Bake according to pizza crust instructions.

I have made this with grilled chicken added. I have followed the original recipe and added the chives. I find that as long as the ingredients listed above are part of this pizza you can alter little things and it always turns out heavenly. This is J's most requested meal. It is super easy and tastes like you got it in a restaurant. I've also drizzled a tsp of olive oil over it before baking and I think this time I used a tsp of honey instead. The honey added a nice sweetness to parts of the pizza that didn't have pear on it.


Monday, October 19, 2009

Autumn Risotto


I LOVE risotto, love, love love it! J on the other hand has been tolerating it because that's the way it works at our house. He tolerates what I cook and then most likely sneaks more food after I go to bed. Tonight's dinner was a carry over from one of the meals I was supposed to make last week. I made a variation of an Autumn Risotto I found. Sadly, I'm not a huge fan of butternut squash, so I used a sweet potato in tonight's risotto. As a general rule I don't like to mix starches. I don't want potatoes in my pasta or on pizza. I don't like to eat a Spanish tortilla sandwich etc. This was an exception for me. This was also exceptional for me.

Autumn Risotto
(adapted from anticiplate)
1 sweet potato (yam?), cubed
2 tbsp salted butter (or just add a little salt to unsalted butter)
pinch of cinnamon
4 sweet apple chicken sausages, cubed
1/2 tbsp olive oil
1/2 large sweet onion, chopped
2 cloves garlic, chopped
1 tsp each chopped fresh sage and rosemary
1 cup arborio rice
3.5 cups fat free low sodium chicken broth
1/2 cup apple cider
salt
pepper
pepitas (roasted pumpkin seeds)

  1. In a microwavable bowl add an inch of water to cubes of raw potato. Cook approx 5 min or until slightly tender.
  2. Melt butter and sugar in a pan and add potato. Finish cooking in the butter mixture and set aside.
  3. Heat oil in a pot (or large pan). Add sausage and cook partially. Add onion and garlic and finish cooking sausage. Add sage and rosemary.
  4. Add rice and stir to coat with oil, about 1 minute. Add broth and cider 1/2 cup at a time (they should be warm or room temperature not cold) stirring semi-constantly. Rice with take on a creamy texture.
  5. Season to taste with salt and pepper. Garnish with a sprinkle of pepitas.

Apple, Brie, and Onion Panini

This, believe it or not, is mostly a Weight Watchers recipe. I wasn't planning on deviating but silly me I guess I just can't help myself. J wanted a little Virginia ham on his sandwich and no onions so his is a little different.

J's Sandwich:
Ham
Brie
raw honeycrisp apple
sourdough bread
spreadable butter

My Sandwich:
onion
brie
honeycrisp apple
sourdough bread
spreadable butter
apple cider

Basically I just assembled his sandwish and spread (very lightly) the spreadable butter on each side before putting it on the panini press (I just have a stovetop version). For my sandwich I cooked the apple slices and onion with a little cider and then put that on the sandwich with the cheese and cooked it in the same way as J's. This was our lunch on Sunday. I was sick so I didn't want to go out of the house and make it worse or contaminate anyone.

Sunday, October 18, 2009

Pumpkin (squash) Pie


Remember when I first started this blog and I said I would be blogging about pumpkin pie? Well the wait is over. I've been seeing more long-neck pumpkins in the store each week and I realized I still have most of the pumpkin still in the freezer from last year. So today I decided to make some pumpkin pie. The recipe comes from J's grandmother. Last year I had a pie making tutorial and learned how to make pumpkin pie and pot pie. My grandmother told me that they used to have pumpkin pie and squash pie at Thanksgiving. I've never liked pumpkin pie, but this is what her family would have called squash pie. Whatever you decide to call it, it's still delicious!

Pumpkin Pie (makes 2 pumpkin pies)

1 recipe double pie crust
2 eggs beaten
2 cups long-neck pumpkin puree
3/4 cup sugar
1/2 tsp salt
1 tsp cinnamon divided
1 can evaporated milk (13 oz.)- I used fat free but J claims this ruined the pie, but I can't taste the difference
1 tsp vanilla

  1. Place each crust into a 9" pie plate. Flute edges or embellish to your liking (I forgot and it tasted just as good, of course :P ).
  2. Mix filling ingredients in order given. Pour into pie shells (the filling make approx. 1 quart total so half in each. If you have a large mearsuing bowl with a spout it's best to use it to be more precise)
  3. Bake in a preheated oven at 425 degrees for 15 min. Reduce temperature to 350 and bake another 45 min or until knife comes out clean. Cool and serve,with whipped cream if you like.

Pie Crust: 2 cups flour, 1 tsp salt, 2/3 cup + 2 tbsp shortening, 1/4 cup cold water

Mix flour and salt in a bowl. Cut in shortening with pastry blender, sprinkle with water 1 tbsp at a time. Gather dough together with hands and be sure to get all the dough form the sides of the bowl. Press firmly into a ball. Roll out for two 9" crusts.

Saturday, October 17, 2009

Mushroom Dip


Years ago, my mother took me to a vegetarian (and partially vegan and/or gluten free) restaurant in Clarksville, MD called Great Sage. I only went a few times but I really liked it (haven't been back but it's probably still pretty good if you are looking to try it out, it seems to still be in business). Besides the spinach salad, which was very good, my favorite thing to get and really my only real reason for going was the trio of spreads (dips?) appetizer- carrot, mushroom, and beet. If I recall, I don't actually remember eating the beet spread as a teenager. Unfortunately they completely changed the menu and this was cut from the list. I still think about it fondly and when looking at the weekly grocery store circular and seeing cremini mushrooms on sale, I decided to try and find a recipe for a mushroom dip. As usual I couldn't just follow the recipe like a good little soldier. So far I've done a carrot dip and now the mushroom, all I have to do is try my hand a beet dip and I'll be all set. So here it is (probably could have a better picture but this was done on the fly) the mushroom dip.

Mushroom Dip (adapted from MAC & CHEESE, adapted from Urban Vegan)

1 2.25 oz bag of pecans, toasted
1 tbsp olive oil
8 oz cremini mushrooms
1/2 sweet onion, chopped
3 cloves garlic, grated
2 tbsp cream sherry
1 sprig fresh rosemary, chopped
salt
pepper

  1. Pulse toasted pecans in food processor until finely chopped, almost flour-like.
  2. Saute onions in olive oil until translucent. Add mushrooms, garlic, rosemary, and salt and pepper to taste and saute until mushrooms start to soften.
  3. Add sherry to mushrooms, and simmer 2 minutes.
  4. To the pecans in the food processor, add cooked mushrooms and onions and process until smooth.
I served with pita chips and it was delicious. I found a beet dip but haven't tried it yet.

Friday, October 16, 2009

More Pork Tenderloin


This one is just ok taste wise. It look beautiful and is a good concept, but for me I just didn't like the flavor combination. I also think there was WAY too much onion in the sauce. I'm starting to realize that I really prefer my pork with a little bit of sweetness. I also wasn't thrilled with mushrooms and pork together. I know, I know...I sound like such a whiner but the pictures are nice and you may like it even if I don't. Surprisingly J even had some of the sauce (SHOCKING) even though he had crispy potatoes instead of roasted brussel sprouts. So here is my attempt at using up some more of that lovely BOGO pork tenderloin.

Autumn Pork Tenderloin (adapted from Kayotic Kitchen)
1 pork tenderloin (approx. 1 pound)
4 oz mixed mushrooms, chopped
1 medium red onion, chopped
2 heaping tbsp all-purpose flour
1 tbsp Dijon mustard
1 cup fat free low sodium chicken broth
1/2 a cup milk
1 tbsp white wine
4 tbsp butter
dried parsley
Worcestershire sauce
pepper
salt

  1. Season the pork with salt and pepper. Rub all over with mustard.
  2. Heat 2 tbsp butter and saute the onions until they start to soften.
  3. Add the garlic and mushrooms and cook over low heat until everything softens.
  4. Add flour and cook so none of the flour remains raw about 2 minutes.
  5. Add wine and stir, add milk and stir until sauce is lump free. Add the broth gradually as the sauce thickens.
  6. Simmer over low heat 15 min.
  7. Heat the rest of the butter over medium high heat and brown meat on all sides.
  8. Once all sides are completely browned, lower the heat slightly and add approx. 1/4 cup of water. Cover and braise meat turning periodically. Use a meat thermometer to test for doneness. It should read 160 degrees. Remove meat from pan and wrap in foil.
  9. Add parsley to the sauce, along with salt, pepper and a splash of Worcestershire.
  10. Slice pork and drizzle with sauce.
You know as a child the most hated vegetable for kids is Brussels sprouts. Most kids haven't seen a sprout let alone taste them because they have gotten a bad wrap for so long. I think every TV show I ever saw as a kid shouted from the rooftops how disgusting liver and Brussels sprouts were. My mother never made Brussels sprouts when I was a kid, but nonetheless all that propaganda had corrupted me and it wasn't until I was in college that I actually tried one. My friend M really likes them but I can't really do them whole or steamed. It's a textural problem. This is only the third time I've tried them and they were still very good. I had them roasted once before and I've also made them shredded with pasta and pine nuts (highly recommended). This was my first time roasting them myself. It's very easy:

Roasted Brussels Sprouts

2 cups Brussels sprouts, washed removing and unsavory looking outer leaves
1-1.5 tbsp extra virgin olive oil
salt
pepper

Cut sprouts in half.
Toss the Brussels sprouts with the oil, salt and pepper.
Roast on a baking sheet 40 minutes(unless you like them less cooked) at 400 degrees. Turn or toss in order to achieve uniform caramelizing.

I read you can cook at 425 degrees for less time but I didn't try that. I think next time I would cut them in quarters because I prefer the crunchy texture. If you have never tried them I highly recommend it.

Tuesday, October 13, 2009

Tortilla Pie (in a crock pot)


So I've been staring at the leftover piles of tortillas in the fridge, wondering when the last time we even used tortillas and I finally decided that the time had come to use up the last of them. I had 3 whole wheat tortillas and 8 corn tortillas of different sizes. I found some different recipes for various items and settled on a tortilla pie (stack, or lasagna-whatever you want to call it). I read over a few recipes and made something completely different. Here is what I came up with and hopefully it isn't too terrible. I have no idea how it tastes yet. That it be the closing paragraph I suppose...

Tortilla Pie (in a slow cooker)

1.5 pounds ground turkey (93%)
1 yellow pepper, diced
1 sweet onion, chopped
1 tsp peanut oil
1-2 tsp chili powder
1 tsp cumin
1/2 tsp kosher salt
1/2 tsp oregano
1/4 tsp pepper
1/4 tsp cinnamon
1/4 tsp crushed red pepper
2 cloves garlic chopped
16 oz. canned tomato sauce
8 tortillas (or the combination that is listed above)
soft butter
2 cups shredded cheese (Mexican blend or your preference)

  1. Heat oil in a large skillet over medium heat.
  2. Sauté onion until just tender then add onions and pepper and cook several minutes.
  3. Add garlic, chili powder, ground cumin, salt, pepper and oregano.
  4. Add ground turkey. When meat is browned, stir in tomato sauce and continue cooking until hot. Add cinnamon and crushed red pepper.
  5. Line your slow cooker with foil. You can use the foil as handles to lift out the pie when you are ready.
  6. Lightly butter one of the tortillas. Lay one tortilla, buttered side up, on foil in bottom. Spread with the meat mixture and a layer of cheese. Cover with another buttered tortilla, more meat mixture and cheese. Repeat layers.
  7. Cover crock pot, and cook on HIGH 1 hour. When ready to serve, lift out, using foil strips and transfer to serving dish. Cut into wedges. Serve with sour cream, chopped green onion, and salsa if desired.
I used green onion and sour cream, but you could have used lots of various toppings. J mentioned something about why wasn't there any corn in the mix. There are a million ways you could change this recipe but I was able to use up the leftover ingredients I had around. It was pretty tasty and the it could serve 6-8 people which is great.